Thursday, April 18, 2013

Git Along Little Doggies! Yeee Haaaaaa!!


Hello!
      Profound Pride is mine to keep since Melinda asked me, Aunt Josie,  to be a GUEST BLOGGER.    I do not really believe that I am worthy of this honor since she out blogs me handily.....but I am going to do my damnedest to impress.
     Two weeks ago, the Riley Avenue Elementary School in Baiting Hollow held their annual dance.   This year, the theme was the Wild West.    I was enlisted by my sister Mary, who is the self-appointed Queen of Riley, as a PTA Mom and volunteer class helper for her twin sons' teachers.   (She literally wears a tiara when she goes there)    So we went on a mission for inexpensive cowboy hats, bandannas, and some bales of hay to convert the halls of Riley School into Riley Ranch.
  
                                                                    My nephew, Sean

      Last year, the theme was SAFARI, and we crossed a few lines by creating a scene outside the front entrance of the school by parking a Safari-looking jeep and other supplies up on the grass, alongside the entrance.   We didn't ask, we just did it, because everyone knows it is better to beg for forgiveness later, than ask for permission before, particularly when you are pretty sure the permission will not be granted!   Soooo this year, Mr. Enos,  the principal, was mildly concerned about what we had up our sleeves.  This was an anxiety that could not go unexploited, and as I met him, randomly, walking in to the boys' Christmas concert, I told him I was looking forward to the dance this year. He knows me as "Aunt Josie" since I attend a lot of events at the school.   I told him, "we'll be sure not to park on the grass, but how do you feel about livestock?"  Well, this launched a 4 month long string of emails and conversational allusions to "ranch like" animals of all kinds and even the suggestion of borrowing the mechanical bull owned by a local country-western bar.   As the day got closer, he got more and more nervous, fearing the worst.
 
                                                                 Outside the "barn"

      The week before the dance, I emailed my sister and CC'd the principal, some off handed questions about how many water buckets we had, and that we probably needed more.   He asked her over and over, "Are you really going to have animals here?"  And each time, we answered with a question, such as "Are there animals on a ranch?"    or...   "Don't you know how much kids love animals?"   When the big night arrived, we enlisted the help of 2 local police officers who just happened to be there because they are parents of kids who were attending the dance.   As the unsuspecting principal approached the entrance upon his arrival, we made sure that he came in just in time to "catch us" mid-sentence with the officers about how "it's good that goats have small teeth or else more stitches would have been required."  As if there had been a goat mishap only moments ago.   And then we greeted him with "Listen, don't worry, it was only a few first graders who didn't read the sign about not hugging the goats!"     By this time he knew we were full of it, and luckily he appreciated our decorating job, saying that he thought the safari was the best dance ever but this was even better.  


                                              Mary and her husband, my brother-in-law John

          So the kids enjoyed the line dancing, cowboy hats, bandannas, cowboy tattoos, and taking pictures of themselves in the "jail," and we enjoyed it all right along with them.    My nephews are "graduating" from Riley this year, and I just want to send a HUGE and heartfelt THANK YOU to all of their teachers, who were all fabulous in their own individual ways, and also to Mr Enos and Ms. Grimm, the principal and assistant principal, who have created such a positive atmosphere for students, teachers and parents (and AUNTS) at Riley Avenue Elementary.

And THANK YOU Melinda, for allowing me to be a GUEST BLOGGER!!!!!!     :-)

 
                                                                 Mary and Mr. Enos


                                                              That's me, in the lock up!!

Sunday, April 14, 2013

FINISHING your Easter Tree or, The Importance of Finishing a Project, even if it's slightly defective...


     I take after my dad in that I tend to be too much of a perfectionist sometimes.   Sometimes that's a good thing and sometimes it just prevents you from getting the job done.  My house is seasoned with the remnants unfinished craft projects that I started and, midway through, discovered a problem with, and then abandoned since they did not meet up with my perfectionistic standards.  Then there are times when life interferes and you just lose your momentum.

     This Easter tree, for example, started out wonderfully.  I worked all day on the first part, which I showed for you in my last post.  However, then Easter was almost upon us, and I had to battle the crowds for chocolate bunnies and edible whatnots, not to mention taking my daughter to the orthodontist for braces, etc, etc.  When I finally had time to work on this again, it was the day before Easter, and there were eggs to color, etc, etc, and also...  it was crooked.  Well, not exactly crooked, as in, tilting, but it was taller on one side than the other.

     I debated cutting the tall branches, buuuuttttt... in order to really fix it correctly, (here we go, folks) I had to take the one branch completely OFF, and reattach it further down the main branch, which would mean I'd have to take the duct tape off, and the wire, and what if it twisted?  What if I wrecked something else in the process?  How long would that take?  Why didn't I check it before?  What was I thinking?

I delayed.

... and delayed.

... and delayed.

     And finally I decided that a finished project is better than an unfinished and abandoned project, and I will just make a mental not to check for symmetry at the appropriate time on the next project.

     So now that I had decided to FINISH this project, even though Easter was over, I was kind of sad about what to do with it, and then I realized that April (yes, even though it's just about half over) is National Poetry Month... and I had an idea.

National Poet-tree Month

     I'm going to bring this to school and make it a Poet-TREE.  I'm going to ask the kids to write a short poem on a leaf, and hang it on the tree for National Poetry Month.  And now I'm excited about my tree again! 

     Here's what I did for this stage of the project:

     I wrapped each of the branches in plaster strips, purchased from my favorite craft store, Michael's.  Each roll of plaster coated fabric (It looks kind of like the bandages a hospital would wrap around an injured limb, on the bandages are infused with plaster pellets.  You cut strips of the stuff, dunk them into water (in a disposable container, NOT your sink - it would clog your drain!) and wrap them around your  piece of artwork.  The rolls of plaster fabric are about 8 inches wide, and I cut them into strips about 1 to 1-1/2 inches wide.  This tree took two complete rolls.  Each roll was under 10.00, but I used a coupon to purchase each one, so the cost wasn't bad.  


     In the picture above you can see the plaster roll packaging, as well as my disposable bucket (the bottom of a 1 gallon milk container, a pair of yuckied up scissor, and the ruler I was using for who knows what).  This is how far one roll got me.  As a matter of fact, this is where I was a few days before Easter. I wrapped the strips diagonally around the branches, putting a second coat in the opposite direction around branches that needed to be sturdier.


Today, I got smart and finished this project outside, because it's messy.  See how messy?  
OUTSIDE, I tell ya...


My jeans look like they contracted a bad case of white chicken pox.

     Not to mention that it's dusty.  So if it's windy and you can't stand upwind, wear a mask so you don't breath in the dust.

     I would have painted it today, but I wanted it to be COMPLETELY dry first so it's as sturdy as possible, and it doesn't get moldy inside.

Stay tuned!


Sunday, March 24, 2013

Make a STURDY Easter Tree! Part 1


I love Easter decorations, but what do you do with those hanging eggs?  They're always so heavy and the only Easter trees I've seen in the store are these wimpy little things that look like they'd collapse under the weight of one egg.  In fact, I have a box of very pretty glass Easter eggs that I bought about 10 years ago, but I've never used them because I could never find strong enough tree to hold them.  This year, after working with metal screening for the school play and seeing how versatile it is, I decided to make my own STURDY Easter tree.  By the way, you can purchase ALL of this stuff (except the wire hangers) at Home Depot.

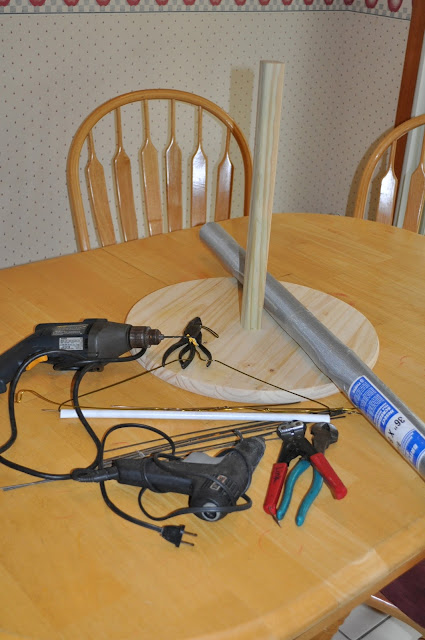
First, I purchased a circle of wood from Home Depot.  As soon as I saw it, I knew it would be perfect.  It was about $5.49.  I gave it to my dad and asked him to attach a piece of wood to the center of it for the trunk of my tree.  (See the one screw in the bottom?  Simple!  Well, for my dad, anyway, but I'm sure you could do it, too. Thanks, Dad!)  


We used a 1x1" instead of a round dowel because I thought the flat sides would be easier to staple the screening to later.  Oh yes, I was right!!  


Next, I found some wire coat hangers, straightened them out and cut them into long strips for the branches.   I drilled holes at angles into the top of the trunk so I could attach the top of the tree.


Then I drilled more holes at angles along each of the four sides of the 1x1 for the branches.  Again, I was so glad I used the flat sided wood instead of a dowel.  I would have definitely drilled a finger otherwise! I had to drill some holes a few times to get the angles I wanted, but no big deal - the extra holes will be covered up in the end.


I hot glued the end of each piece of wire on the end before I stuck it into each hole I had drilled.  Each one set after just a minute or two.  


So far, all of this took maybe 45 minutes. 


Next, I attached extra branches to each main branch.  This took quite a bit longer.    I folded a piece of wire in half, or in a lopsided half, for support on the main branch.


  Then I bent each of the branches back into position depending on the angle I wanted.  Once I had the right configuration, I duct-taped each set of smaller branches onto the main branch. 


 When they were all attached and all the "holes" were filled, I wrapped each branch with wire screening, stapling it to the trunk in the center, and taping it with duct tape on the other end.  

Finally, I attached a thick strip of screening to the tree's platform and ran it up the tree, cutting slices in the sides where it ran into a branch.  I stapled where I could, and duct-taped the rest.  Did I mention that duct tape is amazing?  I probably could have covered this whole tree in white duct tape and called it done, but I really want the extra sturdiness that a layer of plaster sheets will give it.  


Look for part two in a few days.  I want this done before Easter!


Wednesday, March 20, 2013

Treasure Hunting in the Woods


This weekend, the family and I went out for a little walk in the woods nearby to do a little treasure hunting with our metal detector.  Let me be clarify right away - we had no idea what we were doing.

Right down the road from us is a house where, supposedly, George Washington once slept, so we thought we might get lucky and find something old...  maybe some old coins, or buttons from the Revolutionary War.

Or more likely, a hunk of metal from the 1960's.


Well, first we found some deer scat.  In case your wondering, that's the official term for deer poop.


...and some hoof prints.  


I found some of this stuff.  


If I was a deer, I'd sleep on it.  It looks nice and soft, doesn't it?


We crossed a few small streams, most of the time with the help of pre-placed planks and/or logs.


...and then we dug for treasure.  The beeper kept going off.  As soon as we'd finish one hole, we'd walk a few steps and find another possible site.  Of course, most of the beeps were caused by bbs.


Our big metal-detected treasures of the afternoon were a nail...


...and a couple more nail-like things.


My son got a lot of joke mileage out of the object on the top  in the picture above.  He's 13.  
That may explain it.  


More impressive was the moss....


the views of nature...


the few, weird plants


What IS this stuff?  It look like something that might eat meat.  I suspect it's skunk cabbage, but if you really do know for sure, feel free to comment...  I see it every spring.


Placing bets on who could jump a stream and NOT get wet was also fun.


Success!!  (THIS time...)


Poking around in the water was also fun, but would have been even better if it was warmer.


Turns out the real treasure was the walk itself.


Looking forward to next time.


Monday, March 4, 2013

SOMEONE TOOK MY PEN!


I work in a very busy office.  So busy that sometimes we answer two phones at once.  It's not terribly productive to do so, because when you have a different person talking in each of your ears, it's kind of difficult to understand either of them.

While the phones are busy ringing and ringing, people are also coming up to our desks, telling us things and asking all sorts of questions and leaving notes, so incidentally, we gets lots of requests to borrow our pens, and when people borrow them, we're not always paying attention to make sure those people are also giving them back.

Before I was at this desk in this office, I was guilty of asking to borrow a pen too, and there were times I accidentally walked off with "said" pen, not realizing I took it till later on in the day, after I had forgotten whom I took it from.  No one really takes your pen on purpose (at least, I hope not) but short of tying a name tag to my pen (when they signed for their checks on Friday, I gave them all the Name-Tag-Pen, and I got about  5 comments of, "Oh, wait, whose pen is this?  Oh, it's MELINDA'S pen!"  The, "Can I borrow your pen?" question is starting to freak me out because I can go through 2-3 pens a day like this.  At this rate I'll have to get a second job to keep my desk supplied with pens.  Out of this desperation, two weekends ago, I made a few ostentatious pen covers for myself out of inexpensive ball-point pen sleeves and some Sculpey clay.


My favorite pen looks like a large piece of swirled, colorful candy.  I was doing well with the pen, spotting it quickly amongst the piles of papers on my desk, and suggesting they use the pen that's attached to the desk when they needed to borrow one, and then... tragedy struck.

"Oh my GOD, where's my PEN?"

Did you see my pen??  I asked everyone.  I searched the floor, under the papers the floor again - I scanned the room discretely... did someone take my pen?    I remembered having it when I went to lunch the day before...  did I leave it in the faculty room and forget all about it?  I went back to search for it.  Nope, not there - DAMN!  My search widened.  I asked more people.  Damn, someone TOOK my pen!  I considered making an announcement, offering a reward.  How much do you offer for the safe return of a pen?  People asked helpful questions, "Where did you see it last? at lunch yesterday?" "Yes," I answered, "it's possible I put it somewhere, I just don't know where."  Humm...  Did I just put it somewhere unusual?   Finally, I thought I really should look into this possibility.

Well, someone took it, alright.

Apparently, I took it.  It was in my handbag in my desk - I must have put it there the day before at the end of my lunch break.  So what I've learned from all of this is that you can make yourself a pen that people won't be likely to take, but that still won't prevent you from forgetting where you put it.  

Monday, February 11, 2013

Blizzard Nemo... CARnage


A few days ago, the East Coast was hit by a blizzard.  Blizzard Nemo, to be specific because now the weather powers that be have decided that blizzards should be named although, I think a bunch of preschoolers named this one. Who names a blizzard Nemo?

Nemo was scheduled to strike my area in the late afternoon hours.  Since I get out of work fairly early, my commute home was minimally affected.  By the time the howling wind and thunder and lightening (yes, that's right, thunder and lightening!) hit, the kids and I were safely at home watching television and hoping the electricity wouldn't go out (see post "No electricity, No Problem!" from 11/4/2012) but my husband's commute was another story entirely...

He leaves work later in evenings, so when he began the 11 mile trip home, the blizzard had been in full swing for several hours.  He had no idea the weather conditions had become so bad.  When he first called me, it was only about 20 minutes later than he usually arrives home, so I wasn't really worried yet.  He drives a very reliable 4 wheel drive pick-up, so I thought he would be ok.

"I'm gonna be pretty late...  You should see this, there are cars stuck all around me.  I'm gonna have to turn around and go another way..."  We discussed alternate routes.  He hung up and tried a couple of them, only to get stuck behind stranded cars every time, as he told me the next time he called, about 1/2 hour later.  His truck was moving fine, but stuck cars blocked almost every intersection.

He called me another 1/2 hour later. "I'm getting out and walking soon.  I can't take this."  I started worrying.  I've watched too many survivor shows.  Don't they always tell you NOT to abandon your vehicle?

He made it to within about 1/2 mile from the house, beaching the truck on the side of the road after yet another intersection was blocked and this one was also a slight hill covered with ice.   Our neighbor was nice enough to pick him up on a snowmobile.

You should see it out there, it's like a war zone.  Stranded motorists spent the night in a couple of nearby houses.  The picture above is from Saturday afternoon on the nearest non-private road. Six cars in this direction, and another five on the other end of the street.


The neighborhood's dogs were having a grand old time, though.  Here is the other end of the street, with the husky down the road, checking out the scene...


Pretty, right?


Clearing our little road, and our own driveways took ALL DAY Saturday.  And that was WITH the use of a plow (the neighbor plows for us all) and a snowblower. 

Venturing out onto that road shown above on Sunday looked like this:  


Where were the plows?  Of course, it IS hard to plow around 11 stranded cars...  Humm.... what to do, what to do... still, we had seen heavy snowfall before and never experienced this...

But the most annoying thing was that as quickly as we unstuck someone's car, some other bird brain drove by in an ill-equiped car and got stuck all over again.  If you hear conditions are bad, that means STAY HOME!


Today we have this.


Melting, hard-packed snow with water on top.  Nice.


To prove my point that it's not so easy to get unstuck once you're stuck, here's someone's tire.  It came off when they tried to move their car.  


On the public road, the snow is DEEP and slushy.  If you are moving, you just can't stop or  you'll get stuck.  On Saturday morning there was a car stuck right in the middle of this area.   

 Look how deep the slush is... 


...and no matter which way you turn, more slush!


The best way to get anywhere is to walk.  See the walker off in the distance?


Still, by the time we finished our walk, there was a line of cars waiting to try out the road...


These all succeeded.  


But as we walked toward the house, I heard another person get out of their car.  

Stuck again.