Sunday, March 24, 2013

Make a STURDY Easter Tree! Part 1


I love Easter decorations, but what do you do with those hanging eggs?  They're always so heavy and the only Easter trees I've seen in the store are these wimpy little things that look like they'd collapse under the weight of one egg.  In fact, I have a box of very pretty glass Easter eggs that I bought about 10 years ago, but I've never used them because I could never find strong enough tree to hold them.  This year, after working with metal screening for the school play and seeing how versatile it is, I decided to make my own STURDY Easter tree.  By the way, you can purchase ALL of this stuff (except the wire hangers) at Home Depot.

First, I purchased a circle of wood from Home Depot.  As soon as I saw it, I knew it would be perfect.  It was about $5.49.  I gave it to my dad and asked him to attach a piece of wood to the center of it for the trunk of my tree.  (See the one screw in the bottom?  Simple!  Well, for my dad, anyway, but I'm sure you could do it, too. Thanks, Dad!)  


We used a 1x1" instead of a round dowel because I thought the flat sides would be easier to staple the screening to later.  Oh yes, I was right!!  


Next, I found some wire coat hangers, straightened them out and cut them into long strips for the branches.   I drilled holes at angles into the top of the trunk so I could attach the top of the tree.


Then I drilled more holes at angles along each of the four sides of the 1x1 for the branches.  Again, I was so glad I used the flat sided wood instead of a dowel.  I would have definitely drilled a finger otherwise! I had to drill some holes a few times to get the angles I wanted, but no big deal - the extra holes will be covered up in the end.


I hot glued the end of each piece of wire on the end before I stuck it into each hole I had drilled.  Each one set after just a minute or two.  


So far, all of this took maybe 45 minutes. 


Next, I attached extra branches to each main branch.  This took quite a bit longer.    I folded a piece of wire in half, or in a lopsided half, for support on the main branch.


  Then I bent each of the branches back into position depending on the angle I wanted.  Once I had the right configuration, I duct-taped each set of smaller branches onto the main branch. 


 When they were all attached and all the "holes" were filled, I wrapped each branch with wire screening, stapling it to the trunk in the center, and taping it with duct tape on the other end.  

Finally, I attached a thick strip of screening to the tree's platform and ran it up the tree, cutting slices in the sides where it ran into a branch.  I stapled where I could, and duct-taped the rest.  Did I mention that duct tape is amazing?  I probably could have covered this whole tree in white duct tape and called it done, but I really want the extra sturdiness that a layer of plaster sheets will give it.  


Look for part two in a few days.  I want this done before Easter!


Wednesday, March 20, 2013

Treasure Hunting in the Woods


This weekend, the family and I went out for a little walk in the woods nearby to do a little treasure hunting with our metal detector.  Let me be clarify right away - we had no idea what we were doing.

Right down the road from us is a house where, supposedly, George Washington once slept, so we thought we might get lucky and find something old...  maybe some old coins, or buttons from the Revolutionary War.

Or more likely, a hunk of metal from the 1960's.


Well, first we found some deer scat.  In case your wondering, that's the official term for deer poop.


...and some hoof prints.  


I found some of this stuff.  


If I was a deer, I'd sleep on it.  It looks nice and soft, doesn't it?


We crossed a few small streams, most of the time with the help of pre-placed planks and/or logs.


...and then we dug for treasure.  The beeper kept going off.  As soon as we'd finish one hole, we'd walk a few steps and find another possible site.  Of course, most of the beeps were caused by bbs.


Our big metal-detected treasures of the afternoon were a nail...


...and a couple more nail-like things.


My son got a lot of joke mileage out of the object on the top  in the picture above.  He's 13.  
That may explain it.  


More impressive was the moss....


the views of nature...


the few, weird plants


What IS this stuff?  It look like something that might eat meat.  I suspect it's skunk cabbage, but if you really do know for sure, feel free to comment...  I see it every spring.


Placing bets on who could jump a stream and NOT get wet was also fun.


Success!!  (THIS time...)


Poking around in the water was also fun, but would have been even better if it was warmer.


Turns out the real treasure was the walk itself.


Looking forward to next time.


Monday, March 4, 2013

SOMEONE TOOK MY PEN!


I work in a very busy office.  So busy that sometimes we answer two phones at once.  It's not terribly productive to do so, because when you have a different person talking in each of your ears, it's kind of difficult to understand either of them.

While the phones are busy ringing and ringing, people are also coming up to our desks, telling us things and asking all sorts of questions and leaving notes, so incidentally, we gets lots of requests to borrow our pens, and when people borrow them, we're not always paying attention to make sure those people are also giving them back.

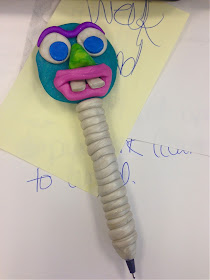
Before I was at this desk in this office, I was guilty of asking to borrow a pen too, and there were times I accidentally walked off with "said" pen, not realizing I took it till later on in the day, after I had forgotten whom I took it from.  No one really takes your pen on purpose (at least, I hope not) but short of tying a name tag to my pen (when they signed for their checks on Friday, I gave them all the Name-Tag-Pen, and I got about  5 comments of, "Oh, wait, whose pen is this?  Oh, it's MELINDA'S pen!"  The, "Can I borrow your pen?" question is starting to freak me out because I can go through 2-3 pens a day like this.  At this rate I'll have to get a second job to keep my desk supplied with pens.  Out of this desperation, two weekends ago, I made a few ostentatious pen covers for myself out of inexpensive ball-point pen sleeves and some Sculpey clay.


My favorite pen looks like a large piece of swirled, colorful candy.  I was doing well with the pen, spotting it quickly amongst the piles of papers on my desk, and suggesting they use the pen that's attached to the desk when they needed to borrow one, and then... tragedy struck.

"Oh my GOD, where's my PEN?"

Did you see my pen??  I asked everyone.  I searched the floor, under the papers the floor again - I scanned the room discretely... did someone take my pen?    I remembered having it when I went to lunch the day before...  did I leave it in the faculty room and forget all about it?  I went back to search for it.  Nope, not there - DAMN!  My search widened.  I asked more people.  Damn, someone TOOK my pen!  I considered making an announcement, offering a reward.  How much do you offer for the safe return of a pen?  People asked helpful questions, "Where did you see it last? at lunch yesterday?" "Yes," I answered, "it's possible I put it somewhere, I just don't know where."  Humm...  Did I just put it somewhere unusual?   Finally, I thought I really should look into this possibility.

Well, someone took it, alright.

Apparently, I took it.  It was in my handbag in my desk - I must have put it there the day before at the end of my lunch break.  So what I've learned from all of this is that you can make yourself a pen that people won't be likely to take, but that still won't prevent you from forgetting where you put it.