Sunday, August 19, 2012

Turn on the lights, Gilly Hicks!


     I took my first trip to Gilly Hicks a mere two weeks or so ago, and my first thought was, This is the most BIZARRE store I have ever been in. 

      According to Wikipedia, Gilly Hicks is owned by Abercrombie and Fitch and was inspired by the phrase "down under" which no doubt is what ties it into the Sydney, Australia location, which is a complete fabrication since it is and always was an American company.  Creators of the brand created the fictional character, Gilly Hicks. whose life is the one on which the store is based.

      For those of you who have never been there, here's a run down:

      Upon entering the store, which I had passed for years without really noticing it because it looks like someone's dark front porch, I saw this:


I got this image online, but the store in my local mall was set up similarly.

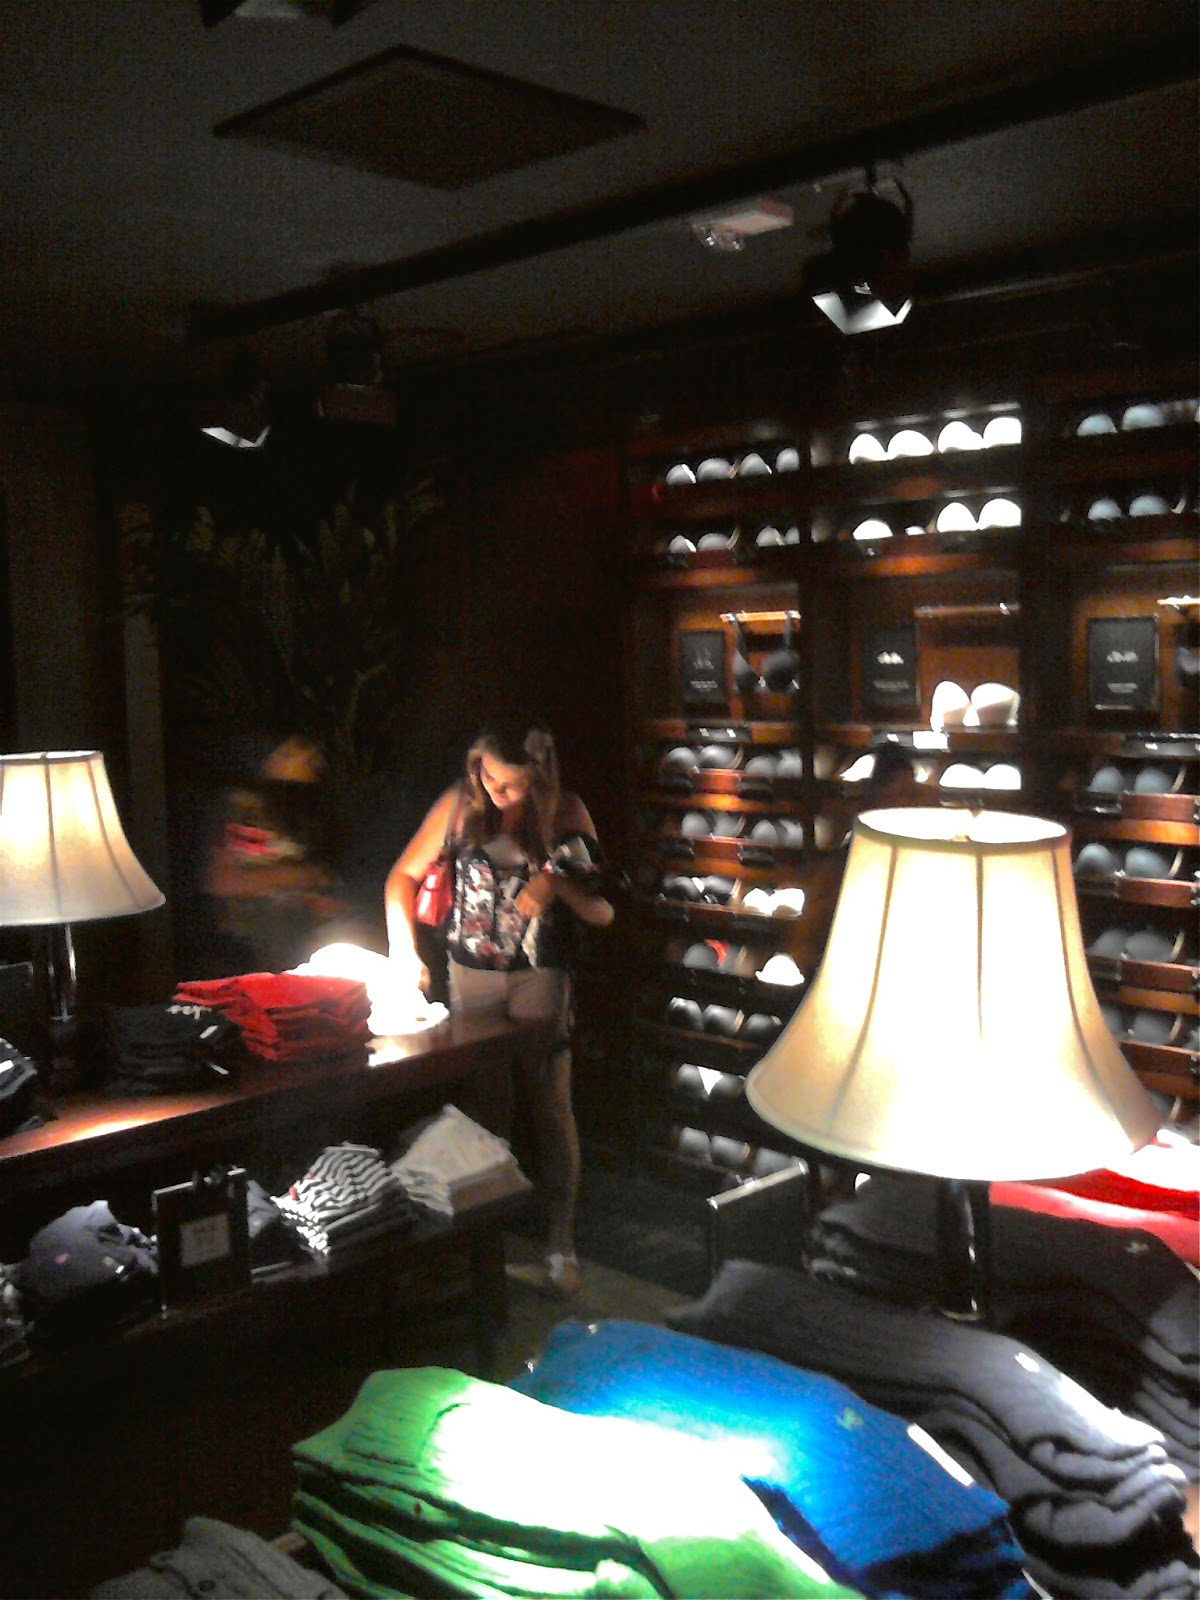
Someone turn on the lights!  And... where are the employees?

     Doesn't this look like a beauty counter at a high end department store (except for the fact that SOMEONE FORGOT TO TURN ON THE LIGHTS). Did the counter girl run off for an extended break before someone came in to cover her shift?  Does it make me a person of bad moral character if I immediately noted how very EASY it would probably be to steal things from the counter?  (And you know you're getting old when you discuss this issue with your peers and they comment on issues of personal safety as well.)

     There was no visible register.  No visible employees of any kind.  No signs, and you wouldn't see the doorways to the next room until you were right in front of them.   We walked back to the very front of the store and peeked into a room on the side, where a lone employee was folding bras in a room the size of a large bathroom, at what looked like someone's dining room table.  "Hi, welcome to Gilly Hicks, do you need any help finding anything?" No thanks, just wondering if I fell down the rabbit hole in Alice's Wonderland.

     We walked into an oval shaped adjoining room with a large drawing of a semi-naked man on the wall, at which point, my son seemed to begin having an allergic reaction to his surroundings.

Mom,

Mom,

Mom.

Mom - can we get out of here, please?

     My daughter, however, was on the hunt for a Gilly Hicks sweatshirt and would not be deterred.   In the adjoining room on the other side of the naked-man room, we finally hit pay-dirt.  Sweatshirts.  Nice ones - on sale for twenty dollars. But when she held up the dark one she liked, we couldn't tell if it was navy blue or black.  Seriously... couldn't tell.  We held it under the beam from the halogen light - blue?  Yes, blue... I think.

     My poor son was practically getting itchy at this point.

     MOM!!  Can we GO now?

     I think he was worrying that someone he knew would spot him in there and he'd never live it down.

     Sure, son, we just have to pay for this.


     And then, another first.  I could NOT find the register.

     It was just like this youtube video...


I actually had to ASK someone to give me directions to the register. 

How embarrassing!


     Yesterday, we went back to Gilly Hicks for more sweatshirts and matching sweatpants.  We managed to find the dressing rooms (due, in large part, to the numerous shoppers standing around waiting with clothes draped over their arms).

Check out the interior of this dressing room:


     Creating some ambiance, maybe? or do they actually think we're going to park ourselves in there and read novels?

 ...in our underwear?


...in the dark, no less?


Tuesday, August 14, 2012

Ocean City, Maryland (Believe it... Or NOT)


We just got back from a somewhat spur of the moment trip to Ocean City, Maryland.  We had been there almost 10 years ago, when the kids were very small, and we had a nice time.

By coincidence, we stayed in the same place we had stayed when we went last time.  The hotel has become a bit run down, but the room overlooked the boardwalk, which was pretty cool.


I spent a fair amount of time looking out the window...  see the mime wearing gold in the lower left of the picture?  He was entertaining.


Another mime.  Or maybe just the same guy after changing outfits and moving to a new spot.


Then there was the sand art...  Some guy created The Last Supper out of sand...


... and he posted signs touting his religious beliefs and asking for donations.

Which I think is lovely, except I was a little disappointed, since we saw this exact same sand art when we were in Ocean City approximately nine years ago.  Can't this guy come up with some new material?  Is his stuff really made of concrete with a light dusting of sand on top?  I would be SO disillusioned to find that out! Come on, sand art guy, I want to see Moses parting the Red Sea in sand, or maybe Jesus walking on water in sand...  I was also wondering about the lights - how does he manage to plug all those extension cords in to light up his artwork?  Does he have a deal worked out with the city?

hummm....


Here's a picture looking down the boardwalk at night.

I would have taken more pictures, except it rained (and I mean POURED) every day except the first.


The sightseeing highlight for us, though, was the giant shark head poking out of the Ripley's Believe It or Not Museum. 


My son talked about this shark head the WHOLE time we were there last (he was 3 years old then)  and for years afterward.  The shark head and tail move back and forth, giving the shark that 
"I DON'T CARE THAT THERE'S A BUILDING IN THE WAY I'M COMING FOR YOU!!!!" look.  


When you go inside for the museum tour, you can see how the parts work from the inside.  


Oh, and there's a bird nesting in the shark's mouth... BELIEVE IT OR NOT.


Tuesday, July 10, 2012

Purging (painfully) and Moving On

my lesson plan book from teaching 7th grade, an article on Ben Franklin, and materials for a Chinese New Year lesson


I have two four drawer filing cabinets full of teaching stuff I'm most likely never going to use.  I had collected the stuff over years, from when I started my master's degree in 2001 all the way through 2008, when I had finally had enough of looking for a teaching job and I decided that I (and my family) needed some normalcy again.

But what to do with all that junk?

For a good six months, I couldn't even look at it.  The thought was depressing.  All that work.  (I particularly loved the props for the Chinese New Year lesson I did for my "Teaching Social Studies" class.)  All that time.  All those hopes...  I had put so much effort into making and collecting the stuff - getting rid of it is like acknowledging that it was a useless effort.

I guess in many circumstances, eventually, there comes a time when you feel the weight of all that "stuff," and you know you have to purge it from your life, but it's still difficult.  I have a friend who would most certainly tell me to not even look through it - "just throw it out,"  but there have been times in my life when I've done that, and down the road, I've regretted not looking through it first - the stuff almost gains more importance when you're not exactly sure what was in there.

For me, sometimes the "stuff" is proof that I was there.  "I have ____, therefore I am ______."  I am working on overcoming this belief, but to quote Inigo Montoya in The Princess Bride, "Slow going, eh?"

This weekend, I finally started on the filing cabinets.  Amid the tossing I took a trip down memory lane.  It was nostalgic, and yes, I am still a bit bitter over certain things, but I am ready to move on.  And you know, today, I do feel a bit lighter.


Wednesday, July 4, 2012

Lunch Time

American flags on a porch 

I am still waiting to find out if my option of taking the summer off will really be an option.  I am hoping it's still on the table, since when I check in with the kids during the day, they tell me they are bored, and they ask me what we're doing when I get home.  (hummmm, how about cleaning the house, cooking dinner, eating dinner and cleaning up after dinner? with maybe some laundry thrown in...  whaddayathink?)  I am keeping my fingers, toes, and arms and legs crossed, hoping it will help.  In the mean time, I am appreciating things like lunch time.

I am lucky enough to work just a few short blocks from the ocean, and when the weather is nice, I like taking a walk to the marina and checking out the sights.  Yesterday, I brought my camera to work and took a few pictures on my walk.

boats in the marina

It was pretty hot, but there was a nice breeze, and the air smelled of wild flowers, and down in the marina, it smelled like salt air and fresh seafood...  the smell of summer.  Nice.


sailboats in the marina

sailboat near the playground

boats in the marina

kayaks

playground in the marina

bicycles in the marina

It's a good life.

Enjoy!  

Happy Independence Day, everyone!


Sunday, June 24, 2012

Paper Mache Fish - Step 3 - Attaching Front to Back


In this step, I'm attaching the front pieces of the fish body and tail to the back pieces of the fish body and tail.  I've been lax in posting this because I realized my fish has a design flaw, and I'm worried I won't be able to compensate for it.  You see, I should have made the body and tail as one piece - i.e., body/tail front, body/tail back.  By making the tail separately from the body, I'm most likely making the area that connects the body to the tail a weak point.  I've come up with a few ideas for  remedying this situation, but if you're just reading and contemplating making a fish, do what I didn't do and connect the tail to the body right from the start.

So to begin this step, I assembled my basic pieces - I also used a few very large rubber bands and a small cardboard box to aid in the assembly that are not pictured here - you'll see how I use them later on.


First, trim the rough edges so they more closely resemble the shape you want.  This is not a precise operation, you just want to make sure they will fit together as nicely as possible.  Do this for both the tail pieces and the body pieces (or, if you are the type that reads directions BEFORE assembly, you will have just one front piece and one back piece - hurray for you, you overachiever!)


This is where my extra large rubber band came in SO handy...  you don't want your two pieces slipping and sliding around after you begin putting the gluey paper mache strips on them...  that would be a great, big YIKES.


 I put a wadded paper napkin in between the two pieces where I wanted there to be some separation - in this case, where the tail will attach to the fish.  You can use the same idea in any location where the pieces aren't laying flush with each other, or if you need to elevate a section.  


Now, begin adding connecting strips of paper mache around the edges...


Make them as smooth as you can to avoid fixing the bumps later on.


I worked for as long as possible with the rubber band on - it helped to keep everything in place.


I kept this end open so that I could slide this over one end of the fish, but as you know, on any future fish, I would make it all one piece...


Walla.....  time to dry.


For the fish body, after trimming excess paper off the edge, I bent the wires around the edges to attach the front to the back.   I added this craft wire with another layer of paper mache after the first layer had dried.  I'm not really sure this was necessary, but what the heck.


This time I found an appropriately sized box that I could stand my fish in while I was working on it.  I didn't have a rubber band large enough for this piece.


It was a little difficult to get the wire bent extremely flat, but I think it will still help make it stronger in the end.


Next stage of fish production:  attaching the tail to the body.


Monday, June 4, 2012

Why I Hate Deer...

Today's breakfast menu for discerning deer - Stella Doro Day Lilies  


This is a nice patch of Stella Doro day lilies in my backyard.  Oh, you only see one flower there?  What?  You want to know what all those stalky looking things are?  They're the STEMS of my day lilies.     I say STEMS because the damn neighborhood deer ate the heads off the flowers. 


I hate deer.  


My day lilies should look like this right now...


When we first moved into this house, the driveway was lined with small boxwood hedges.  The neighbors told us how they used to watch the deer eat the hedges when the previous owners lived here.  They used to look out their windows and laugh - oh how cute the deer were, and too bad they had a taste for boxwoods.  

I thought it was funny myself, not caring much for the boxwood hedge (it was a driveway, not a knot garden in the Queen's backyard) and not yet understanding the futility of fighting with the deer.  

Now, I get it.  


I love plants, and yet, I hate babying them.  I like to plant them, water them a bit, and be done with it.  Since this is my gardening style, plants like roses do not typically make their way into my yard.  I also have extremely sandy soil, lots of shade and no sprinkler system.  I have discovered certain plants that just love my style of gardening (the fend for yourself style):  day lilies, hostas, hydrangeas.  

Salad bar selections for deer.

As the years have gone by, I've tried: 

1. spraying the plants with Deer Off (expensive stuff, necessitating a do-over whenever it rains), 

2. hanging shiny things amongst the plants (my deer are to smart for that crap - either that, or they are also part Italian, and instead of fearing it, they just appreciate a little bling in their surroundings)  

3. sprinkling the garden with garlic powder and/or cayenne pepper or, in a pinch, Taco seasoning (with minimal success, although it sure does overpower the smell of flowers!)

4. placing tufts of dog hair around the garden (they must be laughing at me behind my back when I do this... maybe we're talking about wild deer?  Mine are surely jaded suburbanites)

5. chasing after them, waving long sticks

6. throwing rocks at them to scare them off (again, is that deer laughter?)

7. fencing the yard (I recently proposed to my husband that we top off the 4 foot split rail fence with another 4 feet of fencing on top so the deer won't be able to jump over it.  He asked me if I was crazy.)

I thought about getting one of those motion sensor water jet items, but it's somewhere in the range of 100.00, and I'd need a bunch of them - along with a bunch of hoses, and it seems ironic that I would spend that much effort thwarting the deer when I'm unwilling to put in that much effort to water the plants.  

The only thing that works reliably is this:


... fencing that completely covers the plant the deer like...

Although, if your fence does not COMPLETELY cover that plant, you may get this:

nibbled portions of my Lady in Red Hydrangea
...as I discovered this morning.  


Every month or two, when I'm up getting ready for work and the sun is just coming up, I'll spot a deer in the yard eating my plants and it makes me absolutely nuts.  When our old dog was still alive, I would rip open the back door and tell him, "Get the deer, Nyles, GET THE DEER!!"  He would tear out after them, chasing them to the back fence where they would easily hop over and stand just a few yards off in the woods and stare at him.  If I spot them and they're close, I'll chase after them myself, but it's mostly out of rage rather than a true hope of catching and giving them a good swat.  If my dog can't catch them, I haven't got a prayer.  

About eight years ago, I had a spectacular vegetable garden.  I had planted a whole host of things in it, and my husband was watering it every day. Knowing our deer problem, we had surrounded the whole garden with "deer fencing," which is a heavy netting we stretched across poles we had placed around the perimeter.  

Around 11:00 one night in early August, when the corn was growing high, the tomatoes were ripening and the watermelon was growing to be a nice size, I happened to hear something out in the garden.  I shined a flashlight out the window of the second floor and saw three pairs of glowing eyeballs peering at me from deer-head height in the center of the garden.  I stuck my head out the window...

"HEY!! GET OUT OF THERE!"   

They had the audacity to just stand there and stare at me.

I was FURIOUS.  I ran outside in my pajamas, waving a stick in my hand. 

"HEY!  SHOO!!!" I shouted again.  

They ran a few yards away, back through the ripped garden fence and just over the backyard fence.  I thought I might have won the battle that night.

I went back in the house and 15 minutes later, I checked out the window again.  The same three sets of eyes peered up at me from the garden again, but this time, when I ran outside waving my sick, they actually SNORTED at me, as if to say, 

EXCUSE me, can't you see that we're EATING?

I threw the stick end over end like a throwing ax, and they sprinted a couple of steps away, as if saying, 

Hey, lady, it's dark out, and we know you're going back inside any minute...

I threw a couple of rocks at them, which accomplished absolutely nothing, since I'm pretty awful at sports.  

I went back in the house, defeated. 

The next morning, I inspected the damage.  The garden looked like Mount St. Helen's after the volcano erupted - nothing horizontal was left at all - just the vertical stalks of the corn, and stems of the tomatoes.  Somehow they had discovered if they stood on their hind legs, they could rip the plastic fencing with their hooves, and so they had managed to get in.  

You may have won that battle, deer, but I'll be back...  

I'll be back... 


Saturday, June 2, 2012

Paper Maché Fish - Step 2 - Covering the Armature and Making the Tail


After covering each of my wire fish sides with a layer of dry paper toweling, I then covered each of them with a layer of wet paper maché.  Even though I live in a fairly humid climate, our damp, humid late-spring days have been intermingling nicely with dry breezy days, and those are perfect for drying paper maché.  When I run into a soggy day, I place my newly covered pieces in the basement on a wire rack right next to the dehumidifier. It's been working perfectly.  


As you can see in the pieces above, the large grid wire showed through the first layer of paper somewhat - I remedied this by folding up appropriately sized small squares of paper toweling and placing them neatly into the low spots before I added on my second coat.  Next time I'll use my good old friend the chicken wire to cover the rough shape.


For the fish tail, I cut up a 1 gallon plastic milk container and applied a layer of paper maché to the inside of one piece in a triangle shape.  


Just a note about this, though.  I decided to make two molds of the tail so I can attach them together to give the tail some depth so it's not completely flat.  The first layer came off easily, even though I didn't coat the plastic with anything prior to starting, however, the second layer not only stuck, but it didn't seem to dry as nicely.   In light of that, don't cheap out - use a fresh container every time.


In anticipation of attaching the two sides together, when I put on the second layer, I added a edging of thin, craft wire in a spiral to one of the sides.  I am hoping this will give some strength to the seam.  Now that the second layer is dry it seems to be pretty secure, but initially I wasn't sure it would work. 


After it was completely dry, detaching the paper maché from the armature was easy.  I just pulled off the tape that was holding the piece of dry toweling over the edges, and then pulled gently...


Ah... success!


The next step will be putting these two sides of the fish together, along with the two sides of the tail...  I'm not sure if I'm doing that in two separate steps or one, great big step where I enlist the help of one of the kids (as I did in this picture) to hold it together while I apply the paper maché strips. 

Oh, and my girl wants the two of us to make her teacher a paper maché mermaid as an end of the year gift.  

We dream big!


Stay tuned!!