I've signed up to work on this coming school year's middle school play and I'm excited! The play is Seussical Jr. and there are a lot of large props. I figured I'd get a head start with some of the props during the summer and get things rolling. The first prop I'm making is the Pillberry bush, which is most often pictured as a topiary tree in a pot with large red berries on it.
Here are the supplies I gathered to create this prop:
1 large plastic flower pot (approx. 24" in diameter) purchased from Lowes for about 14.99
2 cans of Great Stuff spray foam insulation - about 3.99 each
5 yards of green cotton fabric and about 8 yards of green tulle - about 35.00 from Joann's
4 packages of ping pong balls from Dollar Tree - 4.00
Things I had at home, or we had leftover at school:
a thin, flat plank I removed from a pallet
Wood screws
2 old bricks
4 long, narrow pieces of cardboard (to cover the topiary's trunk)
a piece of wire fencing, and a similar sized piece of deer netting
a 5 foot long 1x2 (at least, i think it's a 1x2)
a large ball of wire - a leftover planet from the the Interplant Janet scene in Schoolhouse Rock (see posts from 2012)
This was my plan of attack:
I made a template for two different sized tapered pieces I would screw into the 1x2 so that it would stand upright inside the flower pot. I used the pallet wood for this, and my husband was nice enough to cut it to size for me. I then arranged the pieces in the pot, held them together with my hand, removed them from the pot and screwed them together.
Then I did the same thing with the second, large set of pieces, attaching them perpendicular to the first set so that the 1x2 wouldn't wobble from side to side. For good measure, I used a level to make sure the 1x2 wasn't tilted. Good thinking, eh?
I plopped the bricks in the bottom of the pot to weight it down so it won't tip over when completed.
Next I attached my wire ball into the 1x2. It already had a hole in on end, so I slid it right into place and hammered a few staple nails in the top to hold it in place. Yeah, I wasn't very good at that part...
I secured the bottom with 2 zip ties.
For the "soil" around the tree, I cut the wire fencing in a circle shape, trimming and squishing the wire so it fit in the pot to sit on top of the upper pieces of wood. I added the deer netting on top of that, so when I sprayed it with the insulation, it wouldn't fall through the large holes.
I wanted to use as little Great Stuff as possible since you CAN'T save half a can of that stuff - the nozzle gets gummed up so you MUST use it all at once. I wanted to cover the trunk of my tree in great stuff, so I cut 4 pieces of cardboard the right sizes and prepped them for a coating of Great Stuff.
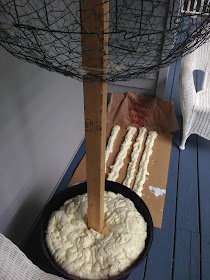
I covered my work area in plastic and got some disposable gloves, then I sprayed the inside of the flower pot so that the bricks don't move, then the 4 pieces of cardboard for the trunk of the topiary, then the top wire/netting layer to make the soil.
Here is the result:
Next post: putting on the finishing touches - fabric, "berries" and "soil."


No comments:
Post a Comment